

[media-credit id=”29″ align=”alignleft” width=”200″]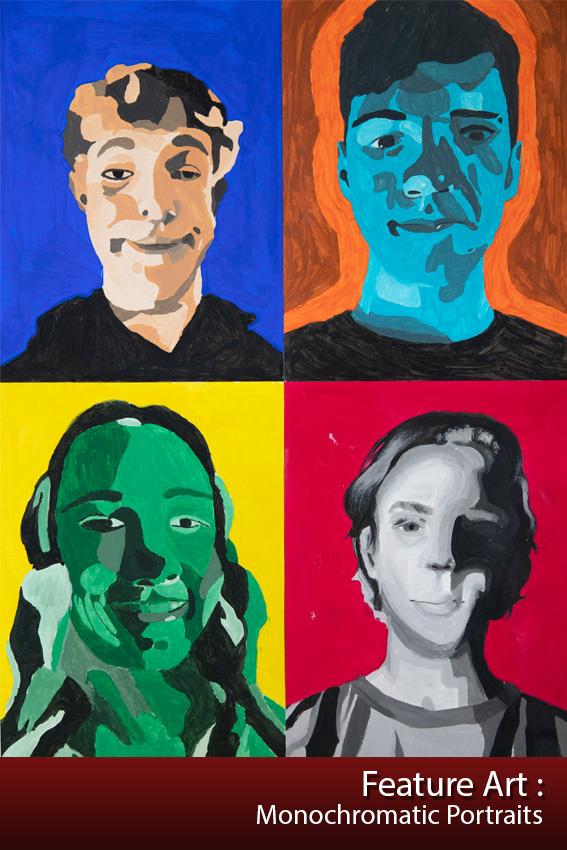 [/media-credit]
Artistic summary by Art teacher Vickey Belmont
Monochromatic portraits are the final project in the color theory unit. This project is ‘the’ project where most students really see that they can and do have the ability to create art. Their confidence is challenged when they start, but as the portraits emerge, using the grid transfer method, their confidence grows.
First-year art students start with taking a picture of themselves, with a direct light source. Most students are ‘pros’ at taking a picture of themselves. However, there is more to it than just one click: adjust the light close to your face; find a good angle or pose; decide whether to smile or not.
Portraits are best if the light is placed to one side of the head to give a distinct shadow on the face. I manipulated their photos, changing the image to grayscale. Increasing the shadows to overemphasize the light and dark areas gives the subject a more defined black and white photo. The students then circled the highlighted, light areas and shadowed, dark areas on the image.
The photo is originally a 5 x 7, so the students enlarge and transfer their portrait to a 10 x 14 grid they prepared. When transferring the image, square by square, I tell them, ‘ to trust the square’. The key is to draw only what is in the square; it is less intimidating and the image transfer is more accurate.
Before students begin to paint, they are reminded of the monochromatic landscape that they previously completed. This serves as their color strip for this project, the value scale helps them to achieve the different levels for the monochromatic color scheme. The virtual instructor website explains the importance in drawing, of knowing where a light source is, value scale and tints.
Once the students outline the low and highlights of their portraits, they give each value a number from 1 – 9. Their picture becomes a paint by number portrait that they can
Starting with the color from the bottle, it is best if they begin with the middle number of their value scale. A small amount of white or black paint is added as the student moves to the highlights and shadows of the painting, depending on the value that they need..
Time management is also very important when working on these portraits. As the student adds white or black to the color, they need to make sure they have time to finish that particular value. Coming back to paint the same value on a different day is difficult; it is very hard to recreate the same exact shade or tint.
When they are finished, student artists have a unique but distorted looking portrait that is reminiscent of abstract works of art from artists such as Pablo Picasso in his blue period or the portraits of Chuck Close, such as Elizabeth (1989) or Jasper (1997-1998). The National Gallery of Art has this information on Chuck Close and some of his artwork. If you are interested in making your own monochromatic self portrait there are many ‘how to’ videos that will help you from start to finish.
Marshall Goldsborough and Tyler Smith, Juniors, Sophomore, Donovan Guglielmana and Freshmen, Emma Lien, have shown that they understood the concepts of grid transfer drawing and monochromatic painting. They have fully completed the assignment and are some of the best from their classes.
For more Feature Art visit, Feature Art No. 2, 2021-22: Notan
To read more from The Feather visit, FC Serve Day 2022